Category Archives: Helpful Moving Tips

How to Move Your Mattress

Mattresses are often one of the last items in your home that get loaded onto the moving truck. When it comes time to move to your new place, how do you prepare it for safe shipping? Some of our customers choose to do some or all of their own packing while preparing for move day.

This article offers tips for moving and packing the following mattress types:

Preparing Your Mattress for Moving

Mattresses are perhaps the most important thing in your home to pack. After a long day of moving in, you’ll need your mattresses set up in your new home to get a good night’s sleep. Special mattresses come with their own needs, and many require effort on your part in advance of the move, so it’s best to plan ahead before you move your mattress.

How to Move a Purple® (Hyper-Elastic Polymer) Mattress

The hyper-elastic polymer materials used in making most sizes of these beds are over 100 pounds. Be sure to use more than one person when lifting them.

Safety first! If your bed is going to be wrapped up for less than a day, the easiest, most economical way to move it is to:

  • Wrap it in plastic
  • Fold it in half
  • And tie it with non-stretchy straps (Purple recommends three or four nylon ratchet straps that also make great handles for lifting and carrying)

If your Purple® Mattress is going into storage or it will be in the moving process for more than a day, you’ll want to keep it flat and protected. They recommend using a plastic mattress storage bag then placing your mattress inside a mattress box and sealing it well with packing tape.

For more information about moving a Purple mattress, please visit the manufacturer’s website: https://purple.com/blog/move-purple-mattress

How to Move a Sleep Number Mattress

Similarly to an air mattress, Sleep Number beds must be deflated to prevent damage and boxed properly. The Sleep Number website recommends completely disassembling the base of your bed before moving, though the frame is very sturdy.

How to Move a Tempur-Pedic (or Other Memory Foam) Mattress

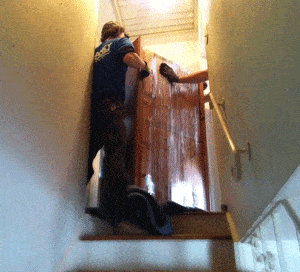
Did you know that if you store memory foam mattresses on their side for long periods of time, they can crack down the side? While the mattress can be folded temporarily to pivot around stairwells in your four-story walk-up, it’s not designed to weather these conditions through a long drive to Dallas or for months of storage in a portable container. Your memory foam mattress must be shipped flat.

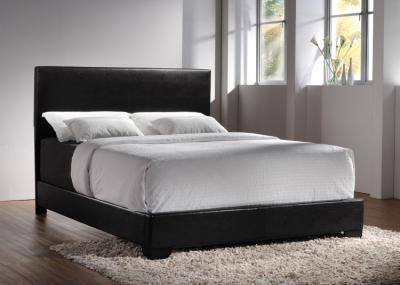
How to Move a Traditional Mattress and a Box Spring

Storing and moving a mattress on its side is simple enough. However, consider the size of your mattress and whether or not it comes with a box spring. These are two separate pieces that your mover will have to account for.

Your mover or packing service will have these ready. Another option is to use a mattress carton, which might provide more protection during a long-distance move.

How to Move an Air Mattress

Simply deflate your air mattress to prepare it for storage. When rolling the mattress, roll it as tightly as possible to prevent any damage. Try to pack it in its original box, as it is guaranteed to fit.

How to Move a Waterbed

To put it simply, moving a waterbed means draining and folding it. But draining a waterbed isn’t all that simple; this process can be a little less complicated with several steps. First, remove your waterbed heater, this protects your mattress while draining it.

Next, decide on how to drain the mattress. An electric pump can be quick and efficient and are often rentable. You can also drain it au natural depending on the make. Refer to the instructions that came with your mattress or your provider for details that might be specific to your mattress.

As you are draining the water, tilt the mattress to get more water out. Roll the mattress like you would a rug. Move your mattress carefully after it’s drained to prevent ripping. If you’re storing the mattress get a conditioner to prevent mold and bacteria, otherwise it should be truck-ready.

How to Move a Futon Mattress

If possible, remove the cover of your futon mattress before moving. If you can’t remove the cover, find a mattress bag that fits the mattress to protect it from stains and damage. Disassemble your frame (keep track of all the parts!) and keep the mattress flat during the moving process, this keeps interior stuffing intact the way the crafters intended.

When you are moving, regardless of your location or how far it is, consult with your movers before putting your bed in the truck.

Tips for Packing Your Mattress

Gather the Right Mattress Packing Supplies

Packing your mattresses can be a little tricky and requires a lot of time and attention. Because they are so important, you want to make sure you do this properly.

In order to pack your mattresses, you’ll need the following supplies:

  • Permanent marker
  • Mattress cartons
  • Plastic bags
  • Moving pads
  • Roll of packing tape

How to Pack Mattresses Securely

As mentioned above, packing a mattress is not a simple task. What complicates it even further is that you’ll often have a mattress and a box spring, each of which has to be packed separately.

If you have more than one bed in your home, the efforts will just multiply. Even if you are just packing up one bed, though, you should always work with a partner instead of trying to pack a mattress on your own.

Follow these steps in order to safely and securely pack your mattress:

  • You’ll need to have the right-sized mattress carton assembled and ready to be packed. With the carton standing on its narrow side, opening facing you, you and your partner should lift up the mattress and carefully put it into the carton. Try not to let the mattress touch the floor as you pack it into the box. Doing so could rip or soil the mattress.
  • Once the mattress is inside the box, seal it shut with tape and label the box with the bedroom destination. Repeat this process for every mattress in your home.
  • After you pack the mattresses, you’ll still have more work do to. The bed frames have to be disassembled and packaged as well. Make sure you have the appropriate tools to remove the frame from the headboard.
  • Once taken apart, put the screws, washers, and any other pieces of hardware in a plastic bag and clearly label it. This bag can either be sealed and taped to the bed frame or put into a box with all of your other hardware bags.
  • The remaining parts of the bed (the frame and the headboard) can then be wrapped in a protective covering like moving pads or padded paper.

Though packing up your particular mattresses may take a lot of work, it is important to do it right. We hope you found our blog helpful. By using the guidelines above, you can pack your mattress the right way, the same way that our professional movers do it here at Clancy Relocation & Logistics!

Would you like help with movingpacking, or storage in NY or CT? Please request your free quote and we’ll be happy to assist you.

How does a company go about moving a CNC Optical Machine?

moving machine 
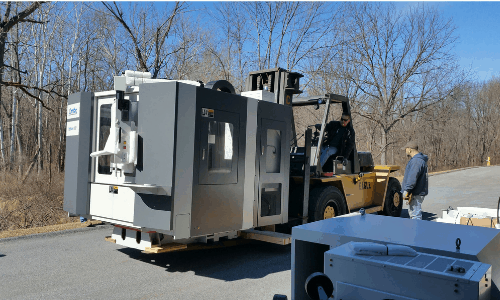
Optical Machinery is a common type of sensitive equipment that we industrial rigging companies are called on to move. A machine like this OptiPro is used to manufacture lenses of various types and sizes quickly and efficiently with high precision. CNC stands for Computer (or computerized) Numerical Control (CNC) because they are operated by precisely programmed commands as opposed to being controlled manually by hand wheels or levers.

Rigging equipment such as jacks, gantries, and forklifts are needed for moving a CNC Optical Machine from one location to another or even within the same lab facility.  If the CNC Optical Machine is being moved to a location far away, a custom crate may be placed around the equipment.  It may even be vacuum bagged (see photo) before being loaded into an overseas container for international shipments.

If your manufacturing lab is looking for assistance with moving a CNC optical machine (or any other heavy manufacturing equipment), please contact us to speak with our team at Eagle Rigging & Transport.  We have the experience and equipment to move your project forward!

You may be tempted to toss all of your shoes into the bottom of a box when packing for an upcoming move or when putting away in storage.  This puts them at risk for physical damage and it can also make it that much more difficult to unpack.  Please read these tips on how to pack shoes to help your footwear survive seasonal storage or your moving truck.

When packing your shoes for a move or storage:

Step 1. Dry shoes out and keep them dry.

Footwear May Contain Moisture. If your shoes are not properly prepped and packed your shoes may get moldy during moving and storage.  Be sure to air out ALL SHOES especially leather athletic and work shoes prior to packing so that they are free of moisture when you place them in the box.

Ditch the plastic wrap, bubble wrap, and baggies.  Even for short local moves, plastic wrapped leather shoes can trap moisture allowing the quick growth of unhealthy mold, stinky fungus or even melt in the heat, sticking to and ruining the surface of your shoes.  Wrap in clean paper or cloth instead.  As an extra measure of security, you may want to powder the insides to ensure all moisture is drawn out of the leather and fabric.

Step 2: Wrap shoes individually, preferably in their shoe box.

Shoes should not be packed too tightly or touching. It is recommended that you wrap shoes in tissue paper and place them in the original shoeboxes to prevent damage from contact with other shoes. This will protect patent finishes and ornaments from accidental damage during transit.

Do NOT use newsprint to wrap your shoes!  The ink may stain them.

How to pack shoes with no shoebox?  If you threw away your shoeboxes or you’d like to avoid wrapping and boxing shoes in pairs, you can also place them in a closet door shoe hanger. Flip-flops and slippers are easier to store this way.  Folded carefully, this innovative storage solution can keep your flat shoes organized and firmly in place during your move.  When packing tall boots, stuff them with a few pairs of clean socks or use “boot shapers” to help them keep their shape before wrapping them in tissue paper. Use extra packing paper if no shoebox is present.

Step 3: Donate or trash the shoes you no longer want or need!

clancy boxes

At every stage of packing, stop and consider if you really want or need the item you are packing.  It benefits you to take every opportunity before moving day to lighten the load.  A few shoe boxes may not seem like much, but every square foot of space not taken on a truck can equal savings.  Go ahead and toss those shoes that are too damaged to repair.  But why not donate those hardly worn like-new shoes that never fit well on you?  Small clothing items and household goods are happily accepted by many local charities.   Some can even conveniently pickup your bags or boxes of items directly from your home leaving you with a receipt for more savings via possible future tax deductions (From $2. to $25 per pair of shoes on average per the Salvation Army suggested donation value guide).

When you are done deciding what shoes will be donated, pack the rest of your shoes into small to medium sized moving boxes (tall boots will need larger boxes). Avoid packing too many shoes or shoeboxes into one cardboard moving box because it might get too heavy to carry.  Double-tape the bottoms of your boxes to play it safe. Write “SHOES” on the outside of each box.

If you have used any plastic storage bins, be sure to inspect them carefully for any cracks or breaks before moving day because a broken storage bin may collapse in transit and items inside may get crushed. Replace the cracked bin or pack it into a larger box for additional protection of your items in transit.

How to Pack Wine Bottles for Moving

Household moving customers frequently ask if we can move their wine and liquor collection. The answer is yes, but always keep in mind the following:  If you have a high-value collection of wine or liquor, extra care should be taken in packing and transporting it.  WINE IS PERISHABLE.  Liquor is less temperamental but, as you may know already, wine is more sensitive to temperature change.

If you are moving less than 150 miles and your items will be delivered within 24 hours of pickup, it is possible to transport perishables that are properly packed and require no servicing in transit.

How to Pack Wine – Preparation:

Some bottles of wine need to be stored at different temperatures.

  • White wines should be left chilled. White wines can be stored at lower ranges at 45ºF. Transporting the wine in a cooler or a climate-controlled vehicle is ideal.  Be sure to remove the guesswork by including a thermometer with the cooler.  You can also try using dry ice and a cooler to keep the wine from getting to warm during transit.
  • Red wines are best kept at 50-55ºF (10-16ºC).

If wines get to hot it will age prematurely and become flat. If the wine reaches too cold of temperatures the lack of moisture will dry out the cork and allow oxygen into the bottle.

Tips for Packing Wine and Liquor Bottles:

Our professional movers are trained to know how to pack your wine and liquor bottles, but if you prefer to do it yourself here are some tips to insure that your bottles stay safe throughout the whole process!

  • Pack reds and whites in separate boxes.
  • Start at your local liquor store for free boxes or other packing supplies for your collection.  They may have extras of special boxes for transporting your wine and liquor in. These boxes are usually packed with Styrofoam and have partitions which will give the bottles extra support.
  • If you are unable to get the boxes from the liquor store, use bubble wrap, towels, linens, t-shirts, or anything similar.  Avoid wrapping the bottles in newspaper as it may scratch or stain the labels on the bottle.
  • When packing the boxes be generous with the layer of padding. Use plenty of crushed paper or bubble wrap. Make sure to put some on the bottom of the box for extra support.
  • Wrap each bottle individually and place them snugly into the box.  Add additional towels or paper to insure the box is packed tightly and there’s no room for any to shifting.

Unpacking:

The most important thing to remember is to not open a bottle of wine right away after transit. The liquor is fine to open but, wine does not respond well to drastic temperature changes. It is recommended to have the wine lay on its side and to allow it to settle for at least two to three weeks before opening it.

If you are moving during the summer or winter months, temperatures can play a part in ruin your wine or liquor collection.  If you have an especially large or high-value collection, you may want to give some consideration to requesting an estimate that includes moving the collection in a climate controlled truck.

Please contact us to arrange to speak with one of our professional estimators today and they will be happy to consult with you to figure out the best way to move with your fine wine and liquor collection!

During the holidays is when many hosts and hostesses take out the family heirloom silverware for entertaining guests.  Real silverware is a luxury item long prized for its brilliant shine – so why does it look so dirty when you remove it from storage?

These grey or black stains on silverware coming out of storage is called “tarnish” and it’s a normal part of owning real silver items.  Silver dishes, cups, forks, knives and other flatware that is put away can come in contact with moisture and start showing ugly tarnish within days.  What is a silverware owner to do?!  Good thing you came across this article because whether you are packing for moving or packing for storage, we have some tips for packing silverware heirlooms just like yours!

Tips for Packing Silverware

Silver flatware has its quirks and details that can add a little more complication to the process so try these easy steps from our movers to assure your valuables are protected.

The dining room includes your most fragile china and crystal stemware. When using Clancy you can trust our skilled professionals to carefully wrap each item in paper then place them in boxes separate from other items. On the other hand, there is often more times than not that heirloom silverware gets neglected. Silverware care is more in depth than you might think. Many people simply throw their silverware in a box and hope for the best until it is called for use again. The ones that are a little more careful, still don’t go far enough to prevent scratches and tarnishing during moves.

Silver molecules combine with other elements for which have an affinity to create a corrosion product which we call tarnish. A special set of flatware must be handled with special care. When packing silver flatware there ways to protect it from those elements that can tarnish your heirloom silver.

Engraved decorations can become faint due to loss of the surface.  Protect the details by following the details.  These silverware packing tips can help prevent this as much as possible by avoiding this gradual, slower loss of silver.  Air-borne sulfurs and chlorides are the strongest tarnishing agents.  Never pack bleaching agents on or near silverware!

Because air causes silver to tarnish, all silver pieces should be enclosed completely in clean tissue paper or plastic wrap with a small piece of chalk in each bag. Loose flatware may be wrapped either individually or in sets in tissue.

Chests for storing silver flatware are generally lined with a fabric which is impregnated with tiny silver particles which sacrificially absorb sulfurs. Adding an inch of chalk saves your silver in a similar way.  Using the easy and inexpensive chalk trick can assure your silver is maintains its condition during travel. It will absorb moisture and slow tarnishing.

Preserving Silverware in 3 Easy Steps

  1. WashThis may seem obvious to some, but it’s a simple mistake that is often over looked while getting everything else ready to move or put items into storage. Whether it’s that people are just pressed for time, the water gets shut off or for some other reason, some of us movers actually end up packing dirty silverware.
  2. PolishBefore putting away your silverware, polish each utensil.  This along with our other preventative measures will help to keep it from tarnishing during transportation.
  3. ChalkSilver pieces should be enclosed completely in clean tissue paper  (not newsprint) with a inch size piece of chalk in each bag. Keep one or two pieces of chalk in the drawer with your good silver. It will absorb moisture and slow tarnishing. Put some chalk in your jewelry box to delay tarnishing there too!

When Moving Local or Long Distance – make sure that you speak with your mover to list your silverware and any other items of high-value.  Our professional, licensed movers will be happy to add these to your “High Inventory Form” so that they receive the proper valuation coverage.  “High-value” is considered any item at a value of $100 per pound or more.

10 Great Questions to Ask Your Office Mover

Below are a short list of questions you may want to ask your office mover before deciding to hire them for your relocation project.

It’s not meant to pose every question you may have for them however as each office move can be different from the next.

If you have a specific question about your upcoming office move, please contact us today.

  1. How long have you been in business? Check with the Better Business Bureau for help determining when they were accredited and their rating.
  2. Have you ever done an office relocation like ours before?
  3. Can you provide a reference for me to call?
  4. Can you also move our servers, computers and networking hardware?
  5. Do you own or rent warehouse space?  Please provide a picture (it says a thousand words).
  6. Will you be using floor protection?  If you are leasing a space many times your building manager will insist you have your office movers lay down floor protection like plastic or masonite sheets as well as provide other protection such as blankets, cardboard, etc. for the elevators (if applicable).
  7. Is your crew experiencing with disassembling and reassembling furniture?  If you are taking your furniture with you, please make sure you let your office relocation representative know what may need to be broken down and where it may need to be reassembled. The more you help your mover prepare, the more they will be able to help you have a stress-free office relocation!
  8. Do we need to empty our file cabinets before the move?
  9. What additional charges could apply to this move?
  10. What packing supplies can your company provide?

And now a question for you… Are you ready for a quote?  Our experienced commercial relocation professionals are available to assist you.  Please click here to request a quote and a member of our team will get back to you shortly.